

I promised our Facebook group that I would do a tutorial for this picture. It features some of the New release stamps from the Lavinia stamps October release. I have to say that I’m blown away by the new fabulous designs! They of course mix and match beautifully with stamps from the whole range (as I have done here) allowing us to build endless combinations of magical scenes!

I used the following stamps:


The steps:
I’ve used again one of my favourite background techniques. Like in the previous posts I began by creating an ink spray print. This was done by spraying a selection of ink sprays ( some with mica) on to good quality stamping or mixed media white card. Spray with water, then press a blank piece of dry card on top and pull apart. The ink will leave two prints which when dry I cut down and use as a background. I use the random pattern to build a scene.

Using torn copy paper and ink I created a bank in the foreground.

I then began to roughly build a scene using grey ink and paper masks for some of the mushrooms. I didn’t want the images too dark. It was just outlines that I needed as I was going to mainly paint over them later.


Once I had a rough design I painted the main images with gesso. This helps with the colouring process later. If you want bolder brighter colour unaffected by the background this is a good way of providing a neutral colouring base. Then I carefully lined up my stamps again and stamped over the top in a dark blue ink. ( sorry forgot to photograph this step- got distracted!)

I extended the tree top using the same line work and layered down colour firstly using zig clean colour markers and then for a little more opacity posca paint pens and white gel pen on some parts.


I did the same to the foreground images. I also used more distress oxide ink to shade the bank and my Stabilo all charcoal pencil to darken the shadow in front of the foreground mushroom. I added yellow dots to the smaller mushrooms and for lighter colour I used my red and yellow Stabilo pastel pencils.


I added leaves in both sizes to the top of the tree in several different colours of ink. I also highlighted the leaves down the left side in paler colours of pastel pencil as the light was coming from that direction.


I stamped some additional mushrooms in both the background and the foreground. For a misty affect I stamped using purple distress oxide ink. I also used paint pens to enhance the colours on various sections of the picture.

Finally when the picture was mounted I added the obligatory glitter!

The close ups:
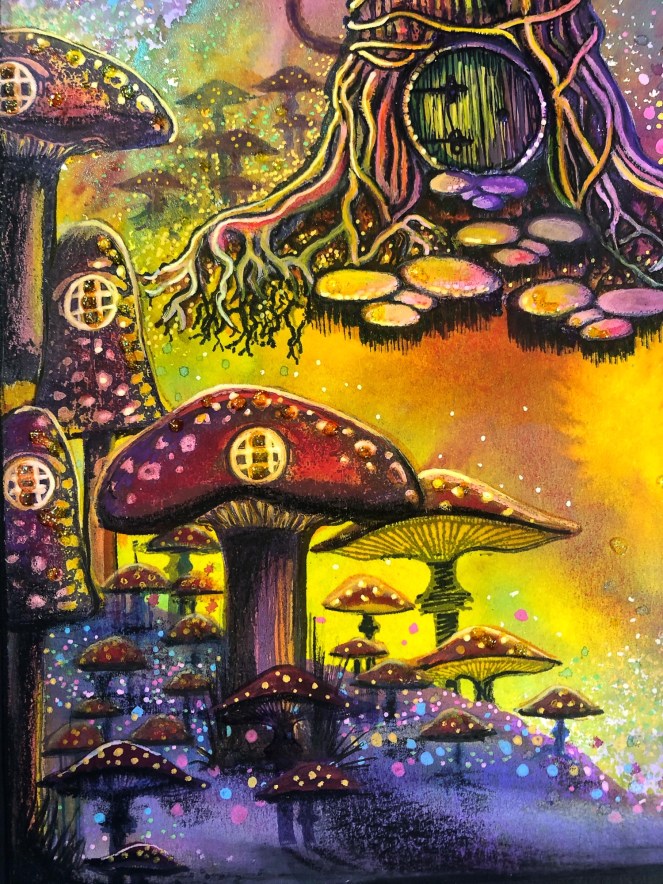


I have to say that I think the Druid’s Inn stamp is one of my favourite stamps so far and I really enjoyed building a mushroom village as a setting for it.
Don’t forget to check out the fabulous samples from the rest of the team for more inspiration and of course our friendly Facebook group
Till next time…
Lisa xx
Fabulous tutorial thank you
No problem. Hope it was helpful.
Beautiful, Love it.
Thank you!
Awesome tutorial, and absolutely stunning make. I am totally in awe of your work Lisa.
Hugz x
Tom McCormack
Awh thanks Tom. So glad you found it helpful ! Xx
Another beautiful creation Lisa, always love your work x
Thank you Michelle x
Fabulous creation! Thanks for the clear instructions and step-out photos.
You are welcome! X
Wow that is truly amazing work. And your tutorial is very clear and concise. I will definitely be looking forward to more tutorials from you 🙂
Thank you that’s kind!
Fantastic thank you for sharing how you made this x
Thank you Julie. You are welcome!
Thank you for the tutorial. I look forward to practising the techniques. The colouring is fabulous.
Great! Thank you. X
Hi Lisa,
I LOVE the atmosphere and your fabulous design and coloring as always, just amazing once again, wow! Thank you for the detailed step-out photos and clear tutorial, that’s so kind.
I love your makes and blog. You are a great artist in my opinion.
Crafty hugs from France,
Corinne X
Very kind Corinne! thank you. I always appreciate your lovely comments. X
You are a genius! I love your art!❤️ Thank you for your blog and posting steps how you create your masterpieces! 🌟🌟🌟🥰
Wow thanks for that! Your comment made my day! Xx
Dear Lisa,
first of all thank you for sharing your steps of how you create your scenes!
It has helped me a lot to find out about my ways, and this was the best inspiration you could ever give to others. I now start mixing any kind of pens and paints and just try out what colour leads to which result. This makes me a lot freer in me creating something on my own.
Then I discovered how witty you were in creating light and shadows in your scenes with the druid’s inn! Fantastic! (My moonlight came from behind the tree… a huge moon close to earth, and that made everything in front of the tree, its bark, the door etc, dark…. plus I was too timid to darken everything. … then I had no good reason to have any light on flowers in the front of my scene). I adore your solution!
Then – I love the scenes you create. It is a moment captured in itself or a moment of watching or wondering. You create an intense moment and it feels as if you were feeling how the colours spread along it and as if you were adding colour by colour and stamp by stamp according to where the colour and its structure take you to.
Thank you so much for sharing!
All the best+
Eva
Eva thank you for your encouraging and kind comment. Each piece develops as I go along. The ink pattern and colour mix is usually my inspiration and I never know how it’s going to turn out. I use what ever art supplies or technique that will create the desired effect or solve the layering problem. I love the creative process and playing with light and colour. I’m so glad you found it helpful. X
Wow! Lisa, your work is always stunning, I keep looking for it all the time on Pinterest,. You have helped me look at colour so differently and not be afraid of it, but to go with the flow. I will try using what supplies I’ve already got differently and hopefully will learn new techniques but I’ve already realised like all crafters that I will need others, the main thing is that I need and want more Lavinia stamps. Thank you so much for sharing, you are an inspiration to us all with all your wonderful art work. X
Sue that’s so lovely of you to say so! I wish you joy and bravery in your creative journey! Xx
LOVE LOVE LOVE this!
Thank you Cindi! Much appreciated !