

Hello my friends I hope you all are keeping well and using some time to be creative. Today’s project features the fabulous new lanterns and shows how to build up a scene on top of a random ink mopping up exercise! Fasten your seat belts!

The stamps used:
The Steps:
Spray some of your favourite coloured ink on to a craft mat or sheet. Pale colour in the centre if you can.Spritz with water. Press white card on top and lift up. Blot off the bits you don’t like with kitchen towel. My background resulted from inky leftovers. I liked the areas that looked like pockets of light.

Cut to size and enhance the background by blending in some distress oxide ink, purple to the bottom and yellow at the top.


Tear some copy paper in a curved shape to act as a mask. Place at the bottom of the picture and begin stamping the lanterns using black ink.

Stamp the fairy in black making sure that her head is in a light part of the background. Continue stamping the lanterns in an arc shape using different colour inks to create the impression of distance.

Using yellow, white and orange pastel pencils draw around the lanterns and gently blend with your finger. Using a white gel pen and paint pens add light to the centres and some extra highlighting along the lines on the lanterns. Do the same to the fairy lamp. Add dots of colour to the background with blue, purple and yellow paint pens.
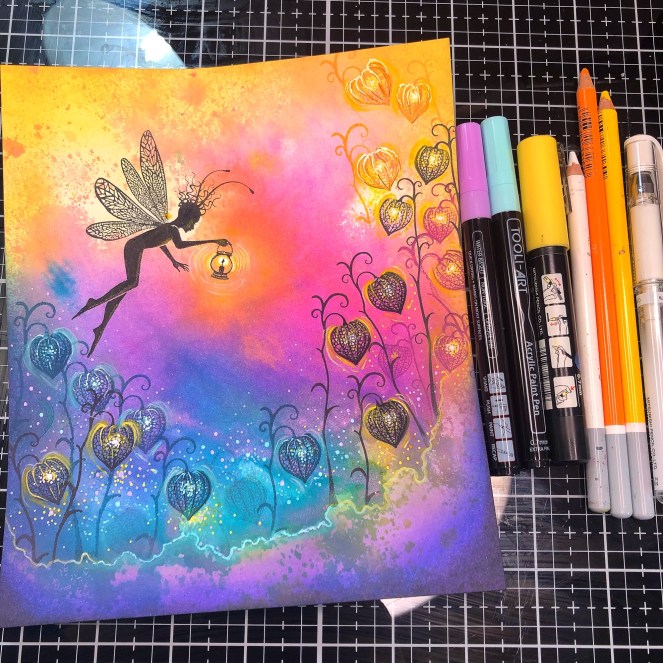
Stamp the verse a few times in black down the left hand side of the picture. Darken around the edges by blending in blue and black ink. Add some additional highlighting to the fairy and the background using a gold stardust gel pen.


Finally mount your work on complimentary card ( I always mount on to black card first to frame the picture and draw your eye to the black focal image ) and add the obligatory glitter to the fairy wings and add a touch of sparkle to where you fancy!

It doesn’t take much to add a little touch of light to a picture. This is just one way that you can make your lanterns glow. Remember the ink at the start will dictate the shape and composition of the project. No two will be the same. Let the ink speak to you!
And don’t forget to shine your light where you can.
Till next time…
Lisa xx
Love the colors on this!
Glad you like it Leslie. I’m very grateful for your comments. Xx